System
Detail Diagram
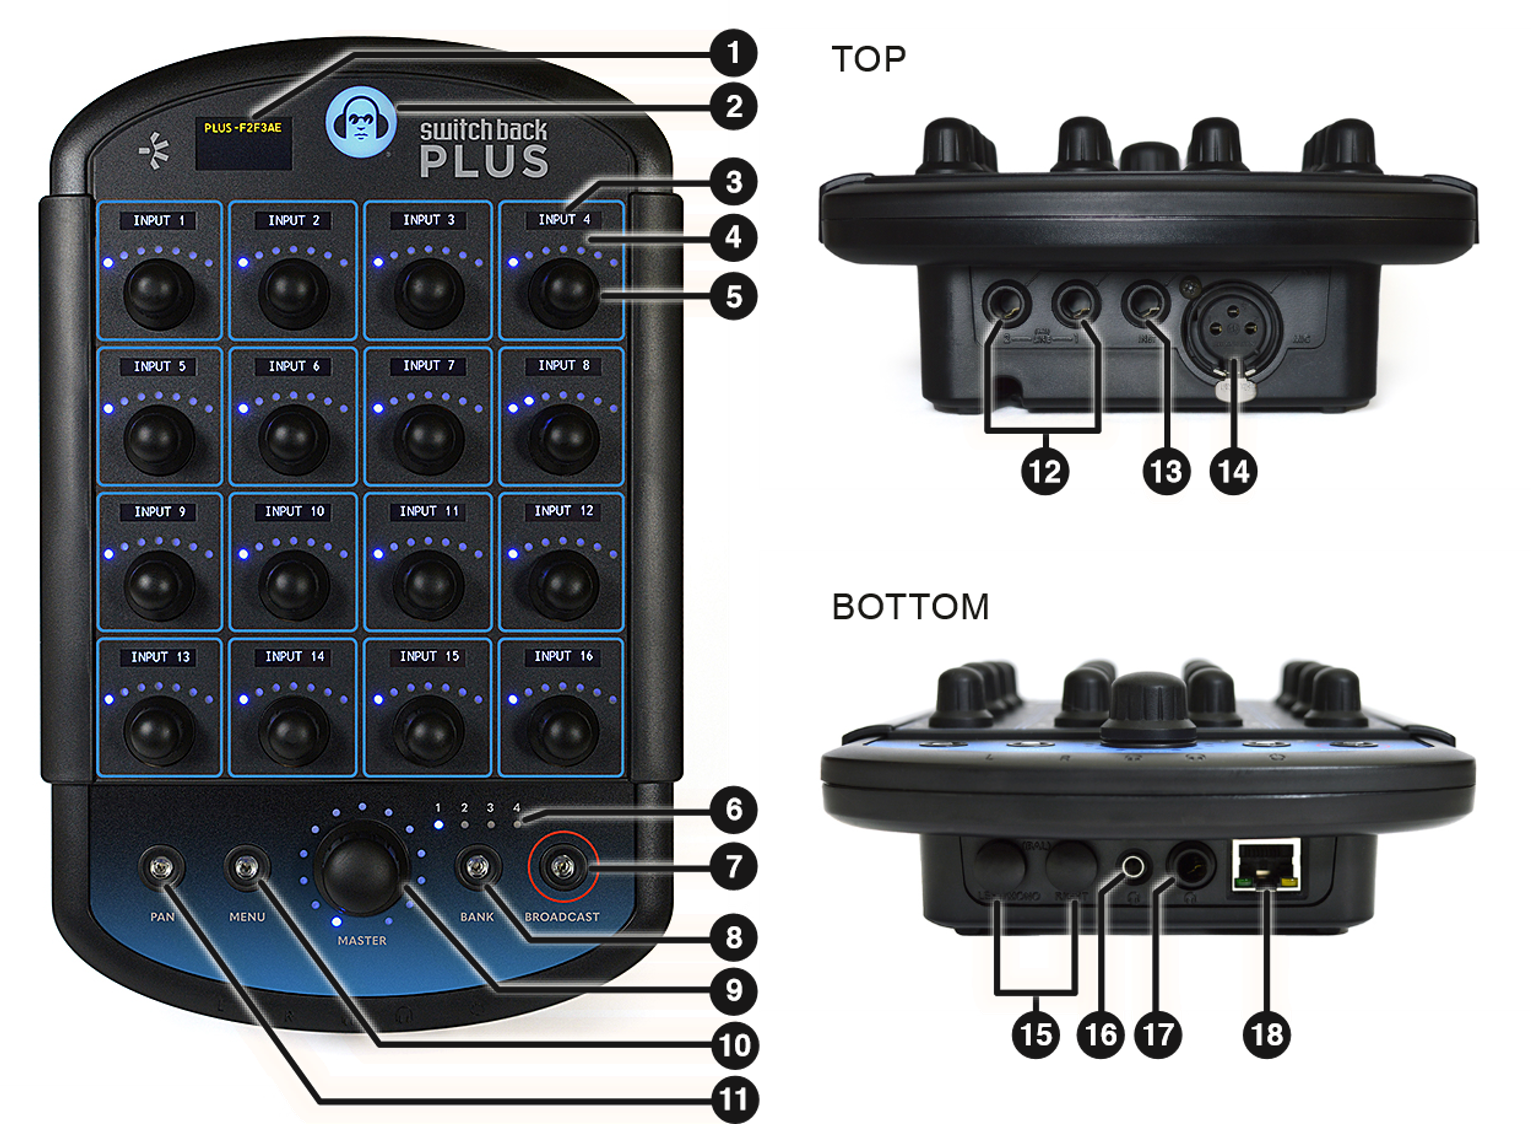
1 | Main Screen Display | 10 | "MENU" Button |
2 | LED Status Indicator | 11 | "PAN" Button |
3 | Channel Screen Display | 12 | 1/4" Line 1 & 2 Inputs (Balanced) |
4 | LED Level Indicators | 13 | 1/4" High Impedance Instrument Input |
5 | Channel Volume/Pan Control and Settings Knob | 14 | XLR Microphone Input with Switchable 48V Phantom Power |
6 | LED Bank Indicator | 15 | 1/4" Left/Mono and Right Outputs (Balanced) |
7 | Input "BROADCAST" Button | 16 | 1/8" TRS Headphone Output |
8 | 16 Channel "BANK" Button | 17 | 1/4" TRS Headphone Output |
9 | "MASTER" Volume Control Knob | 18 | Gigabit Ethernet (GbE) Connection with PoE+ (Power over Ethernet) |
Construction
The Switch Back PLUS is made from a durable, UV-stabilized ABS plastic. A built-in 3/8" threaded insert is provided for mounting the device to a microphone stand. The PLUS also has a cable strain-relief channel to greatly reduce the stress on the CAT6 cable connection.
OLED Displays & LEDs
The 17 OLED displays allow for electronic labeling of your Dante channels, viewing status messages, and updating settings. The LEDs, surrounding the knobs, display mix levels and settings values.
Main Screen Display
The large OLED display will generally show the Dante device name on the top line. The device name can be changed via Dante control software such as Dante Controller.
The screen will also display status messages including but not limited to:
- Volume / pan / width changes
- Settings value changes
- PLUS mode changes
- Firmware update messages
- Audio clipping messages
Channel Screen Displays
The smaller channel displays above each knob will show the configured names for each channel. See this table to explain labels for different channel types.
Any of these labels can be customized in PRO Connect. The smaller channel displays are only capable of showing up to a maximum of nine characters (letters, numbers, or symbols). Names longer than 9 characters will scroll on the screen.
Metering
The audio level will automatically be displayed as a meter on the right edge of the main OLED display. This meter portrays the real-time output level of the PLUS' local mix (post master volume). This meter can be hidden via the Display settings menu (accessed via the MENU button).
A second meter will be displayed if the limiter is enabled to show the amount of master output limiting. This meter is displayed on the left side of the main screen and grows from top to bottom. This meter can also be displayed / hidden via the Display settings menu. See the Limiter section for more details on limiting.
The channel OLED displays also show meters for their respective channels. A horizontal meter displays beneath every channel name. This meter is pre-fader—the audio level before volume settings are applied. To turn off this feature, disable the Channel Meters setting in the Display Settings menu.
Clipping Detection
The PLUS detects digital audio clipping on local analog inputs and the overall mix. If clipping is detected, a warning message displays on the main screen identifying the clipping source. To resolve clipping for a local input, reduce the input gain, trim, or the source level. For the main mix, reduce channel volume levels.
Brightness
The brightness of both the displays and LEDs can be adjusted in the Display Settings menu (accessible via the MENU button). Brightness levels will be stored on the device and recalled between power cycles.
Auto-Dim
By default, the PLUS will dim the displays after 30 minutes of inactivity. Pressing a button or moving a knob will cause the PLUS to return to normal brightness.
You can adjust the timeout for dim in the Display Settings menu accessed via the MENU button.
Screensaver
The displays and LEDs will enter a screensaver mode after 2 hours of inactivity by default. This helps to extend their lifetime and reduce wear. Pressing a button or moving a knob will exit screensaver mode.
The screensaver times can be adjusted, or even disabled, in the Display Settings menu (accessible via the MENU button). However, it is not recommended to disable the screensaver as it may severely shorten the lifespan of the displays.
Text Shift
The displays will automatically shift the displayed text very slowly over time in order to more evenly wear the pixels.
Status Logo
The illuminated Hear Technologies logo (we call him "Jack") serves as a general status indicator. This indicator will be illuminated SOLID BLUE during proper device operation. The indicator will be SOLID RED to indicate internal hardware or software errors. The indicator will be illuminated BLINKING RED to indicate a headphone amplifier short-circuit or overheating. Check the troubleshooting section for further information.
Local Audio Inputs
The four studio-quality inputs (MIC, INST, LINE 1, and LINE 2) located on the top of the PLUS are accessible on the Dante network as discrete transmit channels and also as local inputs that can be monitored on the PLUS itself. To assign a local input monitoring channel to a knob, use Dante Controller to route the PLUS's transmit channel for the desired input locally to a receive channel on the same device. Alternatively, configure a local channel in PRO Connect. You can also mix local inputs without assigning them to knobs in the main grid by accessing their corresponding settings menus using the MENU button.
Adjusting any of the local input volumes, pans or widths for the local mix will not affect the output levels of the Dante transmit channels for those local inputs. The settings that do affect the Dante outputs are listed in each section below.
Metering
A pre-fader meter for each analog input is shown on the "LOCAL VOL" screen on its respective settings page. This meter will also show when a local channel is assigned to a mix knob and channel meters are enabled.
Microphone Input
The XLR microphone input has user-selectable settings accessible via the Mic/Inst Settings menu page. The following settings will affect the signal in the Dante transmit channel and the PLUS' internal mix:
- +48 V phantom power on/off
- 100 Hz high-pass filter on/off
- Analog gain (coarse, increments shown on main screen)
- Digital trim (fine, amount shown on main screen)
The main analog gain setting is the primary way to set up the microphone input, and is applied before the signal passes into the ADC. It is divided into coarse steps of several dB each, so it isn't ideal to change during a live performance. There is an additional digital trim setting that enables finer adjustments and an extra gain boost if the analog gain isn't adequate. The trim adjustments are small enough to be nonintrusive when changed live. This second gain stage is applied digitally after the ADC. To avoid adding unneccesary noise, we recommend setting the analog gain first before adding a boost with digital trim.
Instrument Input
The ¼" TRS instrument input is meant for high-impedance instruments such as those with a passive pickup or other instruments requiring extra gain. This input has the following user-selectable settings, accessible via the Mic/Inst Settings menu page, which will affect the signal in the Dante transmit channel and the mixer's internal mix:
- 100 Hz high-pass filter on/off
- Analog gain (increments shown on main screen)
Line Inputs
The ¼" TRS balanced line-level inputs have no additional filtering or gain staging and are converted directly to a digital signal. The line inputs are transmitted as mono channels in their discrete Dante transmit channels (Dante channels, by design, are single channels). However, the line inputs can be treated as a stereo input to the PLUS' internal mix by linking the two channels together via the Line In Settings menu. Line 1 becomes the left side and Line 2 the right side of the stereo pair. Note that this stereo setting cannot be directly disabled if the line inputs are routed back to the same device as a stereo pair in Dante Controller; one must be unrouted first because Dante routing controls linking.
Dante Audio Inputs
The Switch Back PLUS supports 64 Dante receive channels, allowing you to route up to 32 stereo inputs from other Dante-enabled products (or straight from your computer via Dante Virtual Soundcard). The PLUS takes a left input and a right input from Dante for each mix channel. Use Dante Controller to configure Dante routing. To set up a stereo channel, route the desired left and right sources from Dante to the corresponding "L/Mono" and "R" inputs for the desired channel number. To set up a mono channel, route the source channel only to the "L/Mono" input for the desired channel number. Each pair of Dante channels (or mono channel) routed to the mixer will occupy one knob, allowing you to adjust volume, panning, and stereo-width control of the channel within the Switch Back PLUS's mix.
The PLUS's own transmit channels may be routed back to itself using this method in Dante Controller. There are a few rules for valid self-routing:
- Local inputs may only be self-routed once for each local input
- The microphone and instrument inputs may not be a part of a stereo pair with other channels.
- The line inputs may only be in a stereo pair with each other.
- Line 1 must be routed to L/Mono and Line 2 must be routed to R.
- Mix L and Mix R may not be routed locally, to prevent feedback.
If you accidentally attempt to perform an invalid routing, it will be blocked to prevent unexpected behavior.
Banks
There are 4 pages of 16 channels each accessible by pressing the BANK button. Each bank may contain a mixture of Dante channels, local input channels, MIDI controls, and select device settings (see Knob Assignments). The LED corresponding to the currently selected bank be illuminated bright BLUE. Each other bank LED will be dimly lit if its bank is available, and disabled if its bank is unavailable. The channel labels will update to display the corresponding channel names when switching banks.
Channel count available is constrained by the mixer's sample rate. See the Dante Network page for information on the number of Dante channels.
Local Audio Outputs
Headphone Outputs
The Switch Back PLUS comes with two parallel headphone outputs, one ⅛" TRS and one ¼" TRS, each optimized for 50Ω. Total load should not be lower than 16Ω when using both outputs. The headphone amplifiers have an over-temperature warning that will cause the logo at the top of the mixer to illuminate BLINKING RED if an over-temperature condition is detected. This can occur if there is a short circuit in the connected headphones.
Exercise great care when adjusting the master volume. At 50Ω, the amplifier is capable of sustaining 2 watts of power per ear which could damage your equipment, or worse, your ears.
Line Outputs
Two balanced stereo ¼" TRS line-level outputs are provided. These outputs allow you to send your mix to wireless in-ear transmitters, powered speakers, or any other equipment that accepts a line-level input.
If nothing is plugged into the right output, the left output will be a mono sum of both left and right channels. This can be used to send the mix to a subwoofer or other mono device.
The line-level outputs may be used simultaneously with the headphone outputs. Both sets of outputs share the same mix and are set with the same master volume level. When using both simultaneously, be sure to set the volume of the mix appropriately for the headphones. Then use the volume adjustment of the line-level receiving equipment to further set its level.
In the event of ground loops, when connecting the line-level outputs to other devices that have an earth ground, it may be necessary to lift the shield at the mixer outputs. However, never lift or disconnect the high voltage AC power supply ground of any device.
Dante Audio Outputs
The Switch Back PLUS sends a total of 10 channels to the network as Dante transmit channels. This includes the four local inputs (MIC, INST, LINE 1, and LINE 2), the mixer's pre-master volume MIX L & MIX R, and a normally-muted copy of each local input that is unmuted when the Broadcast function is enabled (see below).
Broadcast
The BROADCAST button unmutes four dedicated Dante outputs from the local analog inputs that are normally muted: BC Mic, BC Inst, BC Line 1, and BC Line 2. Among other applications, this enables setting up an intercom (talk back) system between Dante devices using inputs connected to PLUS devices.
The BROADCAST button unmutes the broadcast channels until it is released. Quick-pressing the BROADCAST button latches it to stay active until the button is pressed again. In either case, the BROADCAST button will illuminate RED to indicate that the broadcast channels are "active" and unmuted.
There is an additional option to mute the normal outputs from the analog inputs while broadcast is active. For example, this is useful if you want to seamlessly use the same microphone for performance and talk back. A musician could press the BROADCAST button to mute their microphone from going to the PA and unmute it in the talk back line simultaneously. To configure, open PRO Connect. In the settings page for a PLUS, in the Inputs Muted when Broadcast Active dropdown, select the analog input you want to switch off when broadcast is active, or all, or none.
See the Dante Network page for more information on the Dante output channels.
There are many possible ways to use the Broadcast outputs. To set up a full intercom system that allows multiple people to talk, here is a recommended setup:
- Connect a microphone to every PLUS that will transmit intercom
- Set each PLUS microphone gain to a useful level, and for microphones that are exclusively used for talk back, set local microphone volumes to zero to prevent constant monitoring
- For microphones that will also be used for performance, set them to mute on broadcast in PRO Connect
- Route the BC Mic outputs from all transmitting PLUS devices to a single mixing device (e.g. a Dante-enabled mixing console, a DAW, or even a dedicated PLUS)
- Mix down all of the intercom channels to one channel, and send it back to Dante (if using a dedicated PLUS to mix, use its Mix L channel)
- Route the new intercom channel back to each PLUS
Now every PLUS will have a dedicated intercom channel. Every PLUS user will hear everyone else who is pressing their BROADCAST button, or anything else included in the intercom mix you created.
Mixing
Channel Volume
Each knob assigned to an audio channel (Dante or local) can control the volume of its respective channel within the mix. Volume operation is indicated by BLUE LEDs above the knobs and is the normal mode of operation. Other modes such as panning or viewing settings will time out and return to volume control after 40 seconds.
Volume scales from 0% to 100% when spinning the knobs from left to right, respectively.
Channel Panning
To control panning of channels, press the PAN button one time while in volume control. The PAN button and the LEDs above each audio knob will illuminate GREEN to indicate that the knob now controls the panning position of its respective audio channel within the stereo field.
To return to volume control, press the PAN button twice or wait 40 seconds after the last adjustment for the system to automatically return.
Stereo Width
Stereo Width only applies for stereo channels. Stereo channels are configured through the routing in Dante Controller and indicated by horizontal bars on either end of a channel screen.
To control the stereo spread of stereo channels, press the PAN button twice while in volume control. The LEDs above each stereo knob will illuminate AQUA. Turning a knob counterclockwise will decrease the stereo spread until the channel becomes mono, then continue by reversing the left and right in an inverted stereo. Turning a knob clockwise will increase the stereo spread.
Master Volume
The MASTER volume knob is used to set the level of the mix to the local outputs. Changes to the master volume will not affect the MIX L & MIX R Dante output channels. These outputs are sent pre-master level.
Audio Limiter
The Switch Back PLUS has a user-configurable, software-controlled audio limiter. This limiter will limit the audio peaks to the local outputs. Setting the threshold, attack, and release of the compressor is possible from the Output Settings menu, accessed via the MENU button. During normal operation, a meter corresponding to the amount of reduction in audio level will be shown on the left side of the main screen if the limiter is enabled and over the set threshold.
The limiter is not applied to the remote output (Dante transmit) channels. It only applies to the mix output heard in the headphone and line outputs.
The limiter's adjustable settings are as follows:
Threshold:
The level that the overall mix must reach before the limiter activates
Attack:
The speed at which the limiter reduces the mix level once the input level surpasses the threshold
Release:
The speed at which the limiter restores the mix level after the input level falls under the threshold
Parametric EQ
The Switch Back PLUS features a 4-band parametric equalizer for shaping the tonal balance of your mix. The EQ is applied to both the analog outputs and the Dante mix transmit channels. The EQ controls are available in the EQ Settings menu, accessed via the MENU button. The menu includes individual controls for the four bands, one band per knob row, and the main OLED display shows the frequency response graph of the EQ curve.
Bands
Each EQ band has a specific frequency range and supports two different filter types that can be selected.
| Band | Default Type | Alternate Type | Frequency Range |
|---|---|---|---|
| 1 | Low Shelf | High Pass | 20 Hz – 500 Hz |
| 2 | Bell | Notch | 250 Hz – 6,000 Hz |
| 3 | Bell | Notch | 250 Hz – 6,000 Hz |
| 4 | High Shelf | Low Pass | 4,000 Hz – 15,000 Hz |
Filter Types
Low Shelf:
Boosts or cuts below the selected frequency
High Shelf:
Boosts or cuts above the selected frequency
Bell:
Boosts or cuts a range around the selected center frequency
Notch:
Applies a narrow, deep cut to eliminate the selected frequency
High Pass:
Cuts below the selected cutoff frequency
Low Pass:
Cuts above the selected cutoff frequency
Parameters
Each band has the following adjustable parameters:
Type:
Toggles between the two available filter types for the band (see table above)
Frequency:
Sets the center or cutoff frequency of the filter
Gain:
Sets the amount of boost or cut from -15 dB to +6 dB. Only available for Bell and Shelf filters.
Q (Quality):
Controls the shape of the filter. For Bell filters, the Q inversely affects the bandwidth—a higher Q represents a narrower affected frequency range. For Shelf and High Pass/Low Pass filters, Q controls the slope of the filter: a lower Q yields a gentler slope. When Q is increased, it will eventually add a resonant peak near the cutoff frequency.
Bypass
The entire EQ has a hardware bypass that can be toggled in the Output Settings menu, accessed via the MENU button. While EQ is bypassed, EQ parameters may not be modified.
EQ Graph Display
While in EQ Mode, the main OLED display shows the EQ's frequency response graph. The horizontal axis ranges from 20 Hz to 15 kHz and the vertical axis ranges from -18 dB to +18 dB. The dotted horizontal line indicates the 0 dB reference. Each band is labeled with its number on the graph.
Solo Mode
To isolate audio from a single channel, enter the Solo Mode menu, accessed via the MENU button. All audio channels will be shown with their knobs flashing AQUA. Spin the knob corresponding to the desired solo channel to temporarily mute all other channels. While a channel is soloed, its volume can be adjusted as normal by turning its knob. This volume change will affect the level in the main mix once Solo Mode is exited. To exit Solo Mode and return to the main mix, press and hold the MENU button.
MIDI
The PLUS can function as a MIDI control surface and an audio mixer simultaneously. Each knob can be assigned to be a MIDI control instead of an audio channel. Both MIDI 1.0 and 2.0 are supported. Adjusting a MIDI knob will send a value 0-127 with its selected Control Change message (CC). Each CC can be mapped to your DAW, hardware MIDI device, or any other other MIDI application to control any parameter you choose. MIDI knobs can be configured to operate in several different modes depending on use case.
The potential uses for MIDI controls are virtually unlimited. For example, you might use a MIDI knob to remotely control...
- a channel volume fader in a DAW
- the threshold in a compressor plugin
- the ADSR envelope on a synthesizer
- the color of a stage light
Setup
The PLUS supports the two major network MIDI protocols: Network MIDI 2.0 and RTP-MIDI. Both use UDP packets to send and receive MIDI commands over a network.
We cannot guarantee compatibility with any future operating system or software version. If you have difficulty setting up MIDI on your computer, first consult the official documentation for your operating system or network MIDI software.
Network MIDI support comes standard in macOS. RTP-MIDI has been supported since Mac OS X 10.4 (Tiger), and Network MIDI 2.0 is supported as of macOS 26.4 (Tahoe). See here for help configuring MIDI network connections on a Mac. For Windows, you will need to install a separate unofficial RTP-MIDI driver (we recommend rtpMIDI by Tobias Erichsen). When Microsoft releases Network MIDI 2.0 support in a future version of Windows 11, the third-party RTP-MIDI driver will no longer be required.
Basic computer setup steps
- Connect your computer to the same network as the PLUS.
- Open the MIDI Network Setup window
- For Mac:
- Open the Audio MIDI Setup application
- Click Window > Show MIDI Studio
- In the MIDI Studio window, click the globe icon on the right of the top toolbar to open MIDI Network Setup
- For Windows using the suggested rtpMIDI driver:
- Open the rtpMIDI application
- For Mac:
- If no sessions are listed under "My Sessions", click the plus sign to create one. If given the choice between RTP and Network MIDI 2, we recommend choosing Network MIDI 2.
- Configure the session names and port number as desired.
- Check the box next to the new session to enable it.
- Select the name of the PLUS in the Directory list on the bottom left. Then click "Connect".
- If connection was successful, the PLUS's name will appear in the list of connections on the right.
The computer should now see your network session as a MIDI device that can be used just like a hardware MIDI device. The PLUS can send control change messages to any other MIDI-compatible programs or hardware devices that are routed to the network session. The PLUS also supports receiving incoming CCs from the network for keeping MIDI knobs in sync. This behavior requires that the DAW or other application is configured to send back to the network session.
By default there are no MIDI controls configured on knobs on the PLUS. To setup knobs to control MIDI signals, use the PRO Connect control software (see Knob Assignments). There are four knob types for different kinds of MIDI controls:
Knob Types
- Level: Send the position of the knob (from 0 to 127) as indicated on its LEDs. Intended for controlling a MIDI parameter.
- On/Off Toggle: Turn the knob to switch between on and off. On sends a value of 127; off sends 0.
- Single Trigger: Turn the knob to send a value of 127. When the knob is turned again, 127 is sent again. Intended for activating single actions.
- Relative: Knob position defaults to the center. When the knob is turned left, it sends a stream of 0 messages. When turned right, it sends a stream of 127 messages. Intended for updating something by a relative amount (e.g., scrubbing through a DAW timeline).
MIDI 1.0 supports 16 channels which (for example) allow multiple devices to use the same message types without interfering with each other. The PLUS defaults to MIDI Channel 1, but can be set to a different channel in the MIDI Settings menu.
Using a wired Ethernet connection to the MIDI network is recommended. MIDI control has been successfully tested with a Wi-Fi connection, but there is a higher risk of dropped packets and additional lag.
MIDI 2.0
The PLUS supports the new MIDI 2.0/Universal MIDI Packet specification. This enables compatibility with future MIDI 2.0 devices. At present, the only practical difference for the PLUS is that MIDI 1.0 uses CC values from 0 to 127 and MIDI 2.0 uses 0 to 4294967295. The larger value range should be automatically handled by the computer connection software. MIDI 2.0 also supports groups. The PLUS is set to always communicate on MIDI Group 1.
Manual Setup
Some network MIDI applications will allow connecting to a MIDI device by IP address and port number. Audio MIDI Setup, for example, has a + button in the list of available devices for manual entry. Use this method if a PLUS isn't showing up automatically or if the network MIDI software you use doesn't support automatic discovery.
IP address: found in the Device Info tab of Dante Controller. You can also see the device's IP address in the Dante Settings menu on the PLUS itself.
The port number depends on the protocol:
- RTP-MIDI UDP port: 5004
- Network MIDI 2.0 UDP port: 5006
Menu Operation
The Switch Back PLUS's menus are accessed via the MENU button. The MENU button will illuminate RED when the device is on a menu page.
To enter a menu page or access other actions, press the MENU button once. The navigation menu will be listed on the OLED channel displays. Spin a channel knob corresponding to the desired menu page or action.
To exit a menu, press and hold the MENU button to return to the main screen, or press the MENU button to display the navigation menu again. Most menus (other than Solo Mode) will also time out after 40 seconds and automatically exit to the normal mixing mode.
The PLUS has the following menu pages, but more pages and options may be added in future firmware updates:
- Solo Mode (Solo)
- EQ Mode (EQ)
- Microphone / Instrument Settings (Mic/Inst)
- Line In Settings
- Output Settings
- Display Settings
- Dante Settings
- MIDI Settings
- Device Information (Info)
The navigation menu also provides access to the following actions:
- Zero Mix
Menu Controls
The menus consist of differing types of controls, with different colors and indicators for certain operations:
| Type of Control | Color | User Interaction |
|---|---|---|
| ON / OFF Control | Flashing AQUA | Spin fast to Enable / Disable |
| Settings Level Control | Solid AQUA | Spin to Increase / Decrease |
| Volume Control | Solid BLUE | Spin to Increase / Decrease |
| Pan Control | Solid GREEN | Spin to adjust pan position |
| Width Control | Solid AQUA | Spin to adjust stereo pan width |
Sample Rate
The Switch Back PLUS will automatically follow the sample rate of the Dante Grandmaster (current preferred leader). If the leader's sample rate is changed, the PLUS's sample rate will change automatically. This can be disabled by switching off the "FOLLOW" setting in the Dante Settings menu. The Mixer is capable of being assigned as the Leader and will become the Leader automatically when no other Dante device is present on the network or no other device is set to be the Preferred Leader. In this case, the sample rate is freely assignable from 44.1kHz to 192kHz. However, due to Dante limitations, higher sampling rates reduce the number of receive channels available:
| Sample Rate | Max Number of Dante Receive Channels | Max PLUS Stereo or Mono Channels |
|---|---|---|
| 44.1 kHz | 64 | 32 |
| 48 kHz | 64 | 32 |
| 88.2 kHz | 32 | 16 |
| 96 kHz | 32 | 16 |
| 176.4 kHz | 16 | 8 |
| 192 kHz | 16 | 8 |
See the Dante Network page for information on the Dante channels.
Lockouts
Specific functions can be locked from on-device access via the PRO Connect remote control software. When the user attempts to use a locked function, the main screen displays "FUNCTION LOCKED". These functions can still be accessed remotely in PRO Connect. Individual lockout options include Pan Button, Menu Button, Bank Button, Broadcast Button, Channel Knobs, Master Knob, and Advanced Functions. Advanced Functions covers most settings in the settings menus, including input gain, filters, phantom power, line input stereo link, EQ parameters, limiter parameters, screen saver options, sample rate following, and MIDI channel selection.
Factory Reset
To return all volumes, pans, settings, and knob assignments to their factory defaults:
- Enter the Info menu
- Press and hold the BANK button for 5 seconds.
- Factory reset will begin.
- Once finished, the PLUS will return to Normal Mode.
Zero Mix
To quickly reset the mix, select "Zero Mix" in the navigation menu. All volume levels will be set to zero, all pan settings to center, and all stereo width settings to full.
Remote Control, Session Management, and Advanced Configuration
All PLUS features and settings can be remotely controlled by a computer using the PRO Connect software. You can also save/load all current settings ("sessions") to files, to recall setups for different performers.
Setup
See Getting Started with PRO Connect for software setup instructions.
Session Management
Session Management is in the Sessions tab. Save all current settings across all or a selection of connected PLUS mixers to a single file with the Save Current Session button. Restore a saved session with the Load Previous Session button. When loading a session, there are options to only restore certain settings and to switch which mixer gets which saved mixer's settings.
Knob Assignments
What is assigned to each knob on the PLUS may be customized in PRO Connect. There are 64 assignable knobs total: 16 each across four banks. To edit a knob, click the black bar with the downward arrow above the knob. A dialog will appear for selecting what the knob will control and setting a custom display name. If a custom name isn't set, the default name for the source will be used (see below). A knob can also be unassigned using the UNMAP button, which makes the knob blank and disables its LEDs. When done configuring a knob, click the APPLY button or press the Enter key to save changes. The following table explains the different knob options:
| Channel Type | Description | Default Name |
|---|---|---|
| Dante | A channel from the Dante network. An icon like a chain link is shown beside a stereo channel; otherwise it is mono. If a Dante channel option in the list is marked as unavailable, it is either not currently routed to the PLUS or there is a Dante issue (sample rate mismatch, network unavailability, etc.). The assignment for a Dante channel does not have to correspond to the knob number; for example, Dante channel 3 may be assigned to knob 24. See Dante Audio Inputs. | The Dante subscribed channel's TX name. For a stereo pair, the left name is used. |
| Local | A monitoring channel for one of the four local analog inputs. If the line inputs are stereo linked, an icon like a chain link is shown beside them, and only one channel needs to be assigned to control both. See Local Audio Inputs. | The name of the local input |
| MIDI | A control to send values for a selected MIDI CC. Choose from CC 0 to 119. The text explanation in the list indicates the suggested use for each CC per the MIDI specification, but you can use any CC for any purpose you choose. There are multiple knob types depending on whether you want to adjust a parameter, trigger an event, or something else. See MIDI Knob Types. | The CC number |
| Setting | A local PLUS device setting. When you adjust a knob assigned a setting, it changes that setting as if you set it in the proper settings menu. Only some device settings can be assigned to a knob. | An abbreviated description of the device setting |
By default, knobs 1-32 on the PLUS are assigned Dante channels 1-32 (the first two banks), and banks 3 and 4 are left blank. This initial setup can be restored by using the factory reset function or the reset assignments button in PRO Connect.